Turkey Stock!

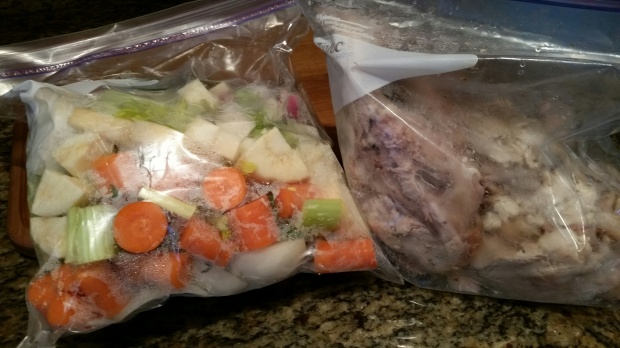
I seem to be able to connive my family out of the turkey carcass every year. I break it into two large hunks and make two big batches, combine the broth together, then cook it and freeze it to use throughout the year. It’s SO YUMMY and a great way to recycle and use all the leftover turkey parts!

Ingredients for EACH crockpot batch

  • 1/2 turkey carcass
  • 2 medium yellow onions, coarsely chopped (large pieces)
  • 7 organic carrots, diced
  • 1 small bunch of organic celery, diced
  • 1/2 turnip, diced
  • 1 parsnip, diced
  • 1/2 bunch of organic parsley
  • 3 sprigs of fresh rosemary (optional)
  •  5 leaves of fresh sage (optional)
  • 2 bay leaves

20161127_093940_resized

INSTRUCTIONS

  1. Throw it all in a large crockpot, fill with water and cook on low for 8-10 hours. (having done this twice, I recommend putting the carcass in first, then the veggies so the bones are fully submerged).
    20161127_094028_resized

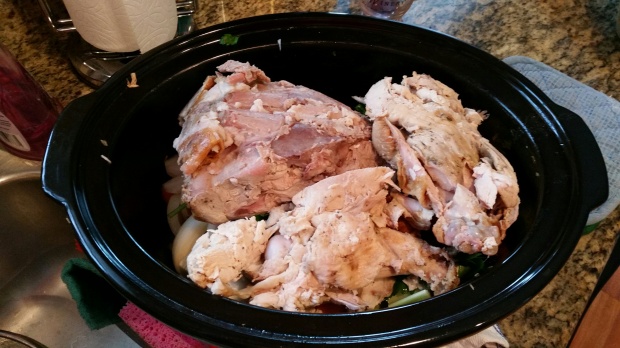
    Before shot of batch #2

    20161127_092122_resized

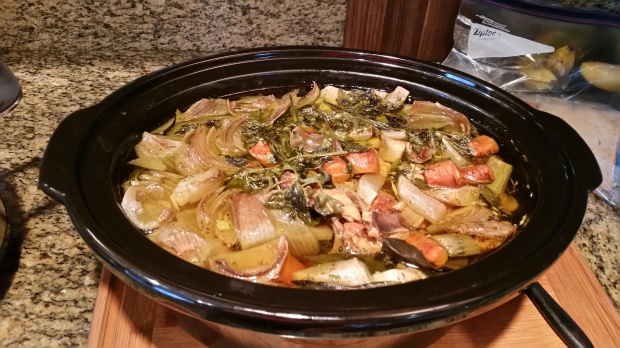
    After shot of batch #1

  2.  

    Once the time is up, set up a fine mesh colander and ladle the soup, carcass and veggies into the strainer, emptying into the garbage every few minutes as it gets full, ensuring it’s drained well each time.  20161127_092956_resized

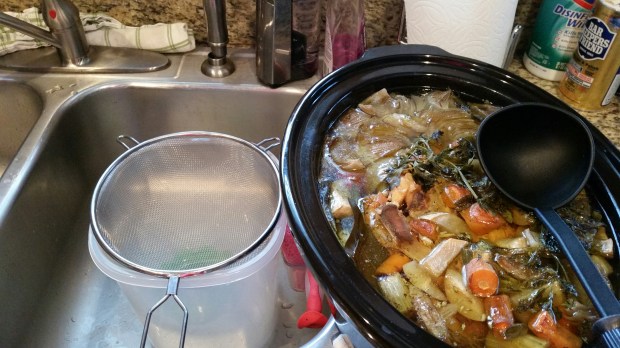
  3. If you are doing two batches, like I needed to do b/c my turkey carcass was THAT big, combine all the soup together and fully cool overnight.
  4. I measure the soup into 1.5 to 3.5 cup jar serving sizes, label and freeze, so I know exactly how much is in there when I need it for a recipe. Be sure to leave a little room in the jars for the broth to expand in the freezer, which it will. Even with cooled soup, never fill a jar of liquid to the top and then freeze it… it will expand and you’ll have a very frozen, very broken jar of soup on your hands (can you tell I’ve done that a time or two?)

I use this stock throughout the year and it really does make the BEST soups. I had a ham hock on hand and made a Ham Hock Vegetable Soup using the fresh broth and it was DIVINE! If you also have a ham hock on hand, get to stocking your freezer for deliciousness!

Crockpot Pulled Pork Chili

Please caution that this recipe packs some SERIOUS punch regarding heat. I’m a total wuss when it comes to spicy food and this was too much for me, but I couldn’t stop eating it because it was so flavorful and delicious. SO… make note of my edits below if you want to reduce the heat for this. Serves 8-10

INGREDIENTS

  • 2 pound pork roast, excess fat trimmed where possible.
  • 5 garlic cloves, peeled
  • 1/2 cup hot sauce (use 1/4 cup if you’re concerned about heat)
  • 3 Tbl smoked paprika
  • 2 Tbl garlic powder
  • 2 Tbl chili powder
  • 1 Tbl cumin
  • 1 tsp cayenne (use just a sprinkle if you’re concerned about heat)
  • 1/2 Tbl red pepper flakes (leave this out if you’re concerned about heat, or use just a pinch)
  • 1 Tbl salt
  • 2 yellow onions, diced
  • 1 red bell pepper, diced
  • 1 yellow or orange bell pepper, diced
  • 2  (14 oz) cans of fire roasted tomatoes (organic if possible)
  • 1 (14 oz) can of tomato sauce (organic if possible)
  • Garnishment options: Sliced avocado, diced green onions, Greek Yogurt, Sour Cream.

INSTRUCTIONS

  1. Place the trimmed pork roast in the crockpot
  2. Press a knife into the roast in 5 spots and press the peeled garlic cloves into the holes.
  3. Pour hot sauce over meat
  4. Sprinkle the dry seasonings (paprika through salt) on top of the roast.
  5. Place diced onions, peppers, tomatoes and tomato sauce on top of the roast.
  6. Cover and cook on low for 8-10 hours (I did 9 and it was perfection)
  7. Garnish as you’d like with avocado, green onions, sour cream and/ or yogurt. Skip any dairy if you’re doing the Whole30

Bacon Deviled Eggs

The title says it all. Basically it should be called “Delicious Yummy Goodness.”
I made these last night for movie night and I had, like, 5 halves left. They were a huge hit! nom nom nom

INGREDIENTS

  • 12 large eggs, room temperature (I leave them out overnight)
  • 6 Tbl Mayonnaise (homemade is best!)
  • 5 slices thick cut bacon, cooled and chopped finely
  • 2 Tbl pickle relish (use sugar free if you’re doing low carb/keto). I used a homemade sweet zucchini relish because I had it on hand but it did have a bit of sugar in it.
  • pinch of salt
  • pinch of pepper (optional)
  • sprinkle of paprika

INSTRUCTIONS

  1. Hard boil the eggs by putting them in one layer in a pot, cover with water by at least one inch. Bring to a soft boil on the stove. Once boiling, cover, remove from heat and let sit for 13 minutes. Use a slotted spoon to put them into an ice bath (I use a large bowl with lots of ice and fill with water). Let sit for 10 minutes or so, then peel while they are chilled, but still a touch warm (they are easier to peel this way), under a trickle of running water. Dry well. (I let them sit on a paper towel for 10 or so minutes while I’m doing something else)
  2. Cut the eggs in half lengthwise and carefully squeeze the yolks out into a medium mixing bowl; crumple yolks with a fork.
  3. Add mayo into the yolks until it reaches a batter consistency.
  4. Add pickle relish and mix, adding a pinch of salt, to taste. (I put in a bit of pepper too)
  5. Add cooled, crumbled bacon and fold into yolk mixture
  6. Fill the egg halves with yolk mixture
  7. Sprinkle with paprika
  8. Eat and enjoy!!

Broccoli Apple Salad (bacon optional)

I made this for a potluck recently as a vegetarian contribution and it was DIVINE. If you added the bacon, I think it would just be that much better! It was also my first ever attempt at blanching a vegetable. Super easy, as it turns out!

INGREDIENTS: (serves 4)

  • 2 cups broccoli florets
  • 1 apple, cut into smallish pieces (I used a honeycrisp)
  • 1/3 heaping cup walnuts, chopped
  • 1/3 cup dried fruit like craisins, raisins or whatever your heart desires
  • 1/2 cup mayonnaise (make it yourself for that extra burst of flavor, recipe coming soon)
  • 2 Tbl apple cider vinegar
  • 1 tsp honey
  • salt and pepper to taste
  • 3 slices cooked bacon, chopped (optional)

INSTRUCTIONS

  1. Blanch broccoli for about 1 minute in boiling water; pour into colander in the sink and cool with cold water. Drain well (let this sit for as long as possible to ensure it’s as drained as you can get it)
  2. In a small bowl, mix mayo, vinegar and honey to a smooth consistency.
  3. Place broccoli, apple, walnuts, dried fruit and bacon (optional) in a large bowl. Add dressing mixture and toss well to combine.
  4. Season to taste.

NOTE: I noticed the salad was a bit runny the first day, but it tightened up the second day and was equally delicious! Yum yum!

Roasted Broccoli & Cheddar Cream Soup

Another one I wish I’d been more diligent on taking photos. This soup is comfort food at it’s best with more flavor than a mouth should be allowed to have. It is SO GOOD. I made it for my book club and it was gone faster than it took me to type this up (aka, it was a big hit). I hope you enjoy it as much as we did!

INGREDIENTS:

  • 1 large bunch broccoli, cut into florets
  • 2 Tbl oil, divided
  • 1 medium onion, diced
  • 4 garlic cloves, chopped
  • 1 tsp fresh thyme, chopped
  • 3 cups stock / broth of your choosing (I used the last bit of my turkey stock from last year’s Thanksgiving turkey)
  • 1.5 cup aged cheddar, shredded
  • 1 cup heavy whipping cream
  • 1 Tbl whole grain mustard
  • salt and pepper to taste

DIRECTIONS:

  1. Preheat oven to 400F.
  2. Toss the broccoli florets in 1 Tbl oil along with a sprinkling of salt and pepper. Arrange them in a single layer on a large baking sheet and roast until lightly golden brown, about 25 minutes.
  3. Heat the other 1 Tbl of oil in a large sauce pan over medium heat. Add the onion and saute until tender, about 5-7 minutes.
  4. Add garlic & thyme and saute until fragrant, about a minute.
  5. Add the broth and broccoli, bring to a boil, reduce the heat and simmer, covered for 20 minutes.
  6. Mix in the cream, cheese and mustard. Let the cheese melt and season with salt and pepper to taste.
  7. Puree the soup with a hand blender or in a food processor or blender and enjoy!


OPTION: You can reduce fat by using milk or cream instead of heavy whipping cream. You can make it Paleo by using canned coconut milk instead of cream/milk also.
OPTION: You could garnish this with crumbled bacon or diced ham, too, for some extra flavor kick!

Roasted Lemon Chicken (low carb)

I wish I had been more diligent about photos because this recipe was incredible. But I got too excited about how easy it was and even more excited about how TASTY it was. The balance between the tart of the lemon and mustard with the savory of the chicken and broth was like little explosions in my mouth with each bite. Enjoy!

INGREDIENTS

  • 1.25 cups chicken stock
  • 1/4 cup freshly squeezed lemon juice
  • 2 tsp lemon zest
  • 1 Tbl olive oil

For the lemon rub:

  • 1 Tbl olive oil
  • 1 Tbl whole grain mustard
  • 1 tsp lemon zest
  • 1.5 tsp dried oregano
  • 1 tsp garlic powder
  • 1/2 tsp dried thyme
  • 1/2 tsp sea salt
  • 8 bone-in, skin-on chicken thighs

INSTRUCTIONS

  1. Preheat oven to 400 degrees F
  2. To make the lemon rub, combine all lemon rub ingredients listed above from oil through salt and using your fingers, work the lemon rub onto both sides of the chicken. I put a little bit under the skin, too. There isn’t a ton of this but you only need a little bit per chicken. It packs a delightful punch, so don’t worry if you think you won’t have enough. You will 🙂
  3. In a large bowl, whisk together chicken stock, lemon juice and lemon zest and set aside.
  4. Heat olive oil in a large oven proof skillet (I used a 12″ cast iron and it was almost too small!) over medium-high heat. Once the oil is hot, add chicken, skin side down and sear both sides until golden brown, 3 minutes per side. Add chicken stock mixture.
  5. Place skillet into oven and roast until completely cooked, through, reaching an internal temp of 175 degrees F, about 30 minutes.
  6. Eat and enjoy! 🙂 If you are doing low carb, this would be great on its own or you can serve over cauliflower rice, quinoa or wild rice.

Nutritional information per thigh and a portion of the sauce:
183 calories, 11g fat, 1 g carb, 20g protein.

Turkey Burger Cauliflower Bacon Casserole (low carb)

INGREDIENTS:

  • 1 head of organic cauliflower (medium sized is perfect)
  • 1/2 cup gluten free flour (I used brown rice flour because I had it around but you can really use whatever you’d like)
  • 1/2 tsp salt
  • 1   12 oz package of uncured bacon
  • 2 pounds ground turkey
  • 1 Tbl coconut oil (optional)
  • 1 tsp onion powder
  • 1 tsp dried oregano
  • 1 tsp garlic powder
  • 1 tsp each salt and pepper
  • 8 oz grated cheddar cheese

SAUCE INGREDIENTS

  • 1 Tbl butter
  • 1 Tbl gluten free flour
  • 1.5 cups heavy whipping cream
  • 2 Tbl yellow mustard

INSTRUCTIONS:

  1. Steam the cauliflower until fork tender.
  2. Place cauliflower into a food processor and pulse until it resembles rice.
  3. Set aside in a bowl to cool then add the flour and salt and mix well.
  4. Cook the bacon in a large skillet until cooked. Remove with a slotted spoon to keep the bacon juice in the skillet.
  5. Transfer bacon to a paper towel lined plate to cool. Once cool, chop into pieces.
  6. Add ground turkey  and 1 Tbl oil (optional, depending on how much bacon grease you have. If you have 2 Tbl or so of grease, pass on adding oil). Cook until browned
  7. Add onion powder, oregano, garlic powder, salt, pepper and mix well.
  8. Remove turkey with a slotted spoon and transfer to a bowl.
  9. preheat oven to 350 degrees F
  10. For the sauce: Add the butter to the same skillet with the leftover grease and turkey juices and stir in the flour over low heat. Cook until the flour has absorbed the butter then add heavy cream and mustard.
  11. Continue to cook on low heat until the sauce thickens.

ASSEMBLY:

  1. Place 1/2 cup of the sauce to the bottom of a 9×13 baking dish.
  2. Spread the cauliflower mixture on the spread as evenly as possible.
  3. Place 4 oz of grated cheddar over the cauliflower.
  4. Spread the ground turkey over the cheddar evenly.
  5. Pour half of the remaining sauce over the turkey.
  6. Places the remaining cheddar over the sauce
  7. Layer the last bit of sauce over the cheddar and top with the chopped up bacon.
  8. Cover with foil and bake for 30 minutes.
  9. Uncover and bake an additional 5 minutes.
  10. Allow to cool out of the oven 20 minutes before slicing and serving.
  11. ENJOY IT (it’s so good)

NUTRITIONAL INFORMATION Per serving, serves 15. 304 calories, 21g fat, 8g carbs, 1g fiber, 18g protein

20161107_161321_resized

Kielbasa, Bacon & Cabbage soup

This. Is. Amazing. End of story.

INGREDIENTS:

  • 6 slices bacon, chopped
  • 16-24 oz of Kielbasa (I used 24oz b/c the Organic pork sausage I bought came in 12oz packages)
  • 1 small head of organic chopped cabbage (about 6 cups)
  • 1/4 cup onion
  • 1 tsp salt
  • 1/2 tsp pepper
  • minced garlic cloves (I used about 5)
  • 1 tsp dried thyme or 1 Tbl fresh thyme
  • 6 cups chicken broth (I had leftover turkey stock from last year so I used that!)
  • Freshly grated Parmesan for sprinkling (optional)

INSTRUCTIONS:

  1. In a stockpot over medium heat, cook bacon until crisp. Use a slotted spoon to remove the bacon onto a paper towel lined plate or, as we do in our house, a paper grocery bag!
    20161026_163515_resized
  2. Add sliced kielbasa and saute until nicely browned.
  3. Add onion and cabbage and cook, stirring often, until softened, about 5 minutes.
    20161026_163727_resized
  4. Add garlic, thyme, salt and pepper, cooking 1-2 minutes more.
  5. Add broth and bring to a simmer. Cook until cabbage is tender, about 10 minutes. Season to taste (I added another teaspoon of salt)
  6. Serve with a sprinkling of Parmesan (optional)

20161026_175456_resized

NOTE: The bacon I used created A LOT of grease. I poured about half out but don’t be surprised as you do want to keep about 1/4 a cup of bacon grease in  your pan for the rest of the recipe. If your bacon creates more than that, you are not obligated to throw any out, just be aware it will make it more rich (not necessarily a bad thing!) 🙂

NUTRITIONAL STATS for 6 servings, using 1lb sausage

321 cals, 21g fat, 8g carbs, 2.5g fiber, 17g protein

Sausage and Veggie Skillet

As I officially feel more transferred into Fall, I’m doing more meal planning and seem to be erring to the side of soups and comfort food. This one pan/skillet dish met all my needs. Hot, fresh, delicious.

INGREDIENTS:

  • 3/4 lb green beans, trimmed and cut in half
  • 1 large head of broccoli, cut into florets
  • 2 large bell peppers (I used one orange, one yellow), chopped into thick squares
  • 9 oz (usually 3 sausages) sausage of your choice, sliced. I used Aidells Chicken Basil Roasted Garlic but any sausage would be good in this!
  • 6 Tbl olive oil
  • 1/4 tsp red pepper flakes
  • 1 tsp paprika
  • 1 tsp garlic powder
  • 1 Tbl each dried oregano and dried parsley
  • seasoned to taste with salt and pepper (I started with 1 tsp each and finished with more salt after cooking)
  • Optional: Grated Parmesan cheese

INSTRUCTIONS

  1. Preheat oven to 400 degrees F. Line a large baking sheet with parchment paper (foil can work, too).
  2. Place all chopped veggies and sausage on your sheet pan. Drizzle the olive oil and spices on top. Toss to evenly coat all the veggies (you can do this ahead of time in a bowl, too, if that’s easier for you).

    20161025_181619_resized

  3. Bake 15 minutes, remove from oven and flip all veggies/meat around. Bake for another 10-15 minutes or until veggies are crisp tender and sausage is browned.
  4. OPTIONAL: Sprinkle with freshly grated Parmesan cheese. (you know I did!)

20161026_123144_resized

NUTRITIONAL INFORMATION:
Serves 6. 278 calories, 20g fat, 16g carbs, 5g fiber, 12g protein

Roasted Bacon Brussel Sprouts

There are a million and one great recipes for roasted bacon brussel sprouts and while I’m sure mine is not unique, it is still darn delicious.

INGREDIENTS

  • 1 lb brussel sprouts, washed, bottoms trimmed and outer leaves removed
  • 4-5 slices of bacon, chopped
  • salt, pepper, garlic powder, paprika

INSTRUCTIONS

  1. Preheat oven to 425 degrees Farenheit and line a large sheet pan with parchment paper.
  2. Spread sprouts and bacon on baking sheet and season generously with salt, pepper, garlic powder and paprika (plus anything else you may like on there!)
  3. Bake for 2530 minutes, stirring sprouts and bacon halfway through
  4. Sprouts are done when fork tender, but not OVER tender (you don’t want to overcook them). If you have smaller sprouts, you may want to cook closer to 20 minutes. Mine were medium so I cooked for 30 minutes and they were perfectly done. Larger ones may require more time.

Eat and enjoy!!

20161026_165924_resized

Roasted bacon sprouts ready for fridge storage!